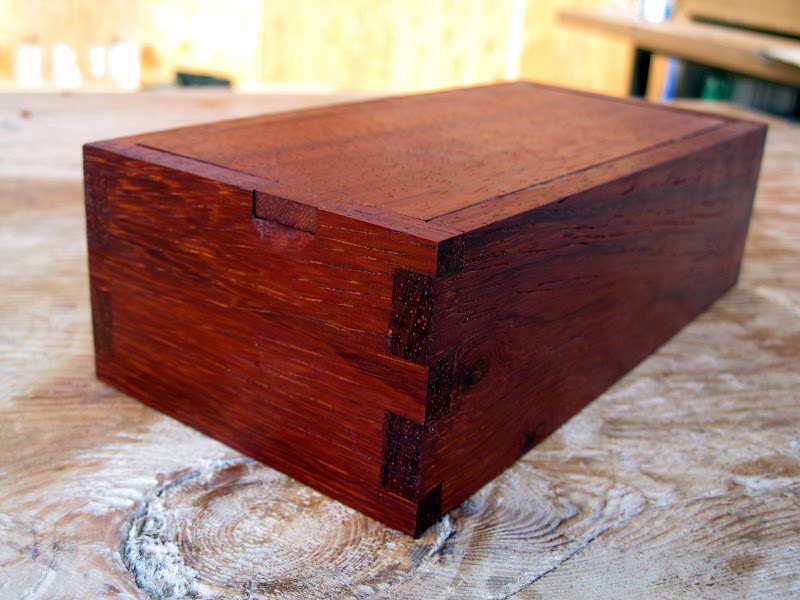
 Its lid hinge is just a lateral wooden dowel affixed to the inside going right into the sides of the box, nothing fancy:

A fellow named Jeff asked about my Japanese tool box pictured in the previous post. I said I'd show a few details of that here.
The design is heavily influenced by Daiku Dojo. The impetus to get a tool box housing my tools precipitated from a lot of the buzz over the past year in the lead up and wake of Schwarz' The Anarchist's Toolchest. I bought his book and read it over a couple times and all I can say is that I respectfully agree with two essential points: a) you need an enclosure for your tools, and b) you can get a lot done with a small amount of them (just what fits in the chest).
I think a lot of people, myself included, got hung up on his use of the big "A" word and what "subversive" means. I suppose one can be subversive by not going to Ikea to buy a piece of furniture. but that's a fairly minor way of being an anarchist. That said: setting my tools out in the open air on my *gasp* IKEA shelves, was a cluttered mess that attracted dust, the bane of all iron tools, and a personal shame for too long! I salute Christopher Schwarz for his work regardless.
Looking over the pictures, it is also obvious that this chest is heavily influenced by the tool kits my dad and I carried to airplane competitions. The box develops over time, to contain the tools as you need them, arranged in a way that is very base-brained. One should be able to find a particular hemostat or tweezers, or glue, without even looking. In "the field", you cannot at all be wasting time foraging through your tool box for a particular item. One should be able to reach for a razor blade, or CyA glue, or piece of reinforcing balsa without thinking, eyes focused on the broken spar, or damage. Gotta catch that thermal brewing on the flight line. You know you have about 5 minutes until the next one develops. That's 300 seconds to load a balsa fissure with super glue, install a new motor into the fuselage, wind the timer, and walk out to your winding stooge, and launch pylon for a new attempt where your flight judge is waiting with binoculars...oh I drift back to those years.
Anyway, here is my kit. I used a bunch of reclaimed redwood fencing from my favorite architectural salvage site, Urban Ore. Ran the wood through a planer and ended up with 5/8" thick planks that I edge jointed into a box whose LxWxH is roughly 45"x14"X14". Held together mostly with nails and drywall screws. I repurposed Sarah's old desk with particle board top (Schwarz has a good term for particle board: "Termite Barf"). This desk elevates the chest to about bench height, and then I put this all on casters. The casters are great. You have a portable tool tray where things can be set without cluttering the bench top. They can be easily repositioned around your work with minimal effort, they are always at an arm's reach and yet out of the way. The rolling service desk idea came from a surgeon who commented on Schwarz' blog and I cannot agree more with the utility of such an approach in an operating room, having been the recipient of much surgery over the past decade or so:

I borrowed heavily from Anarchist's Toolchest in setting up the interior. Two sliding trays of increasing depth allow me to separate my tools into groups that are sensible to me. Measuring stuff is low profile and always at the top, followed by my beloved few knives and chisels, and marking guages. Then the planes and saws at the bottom.


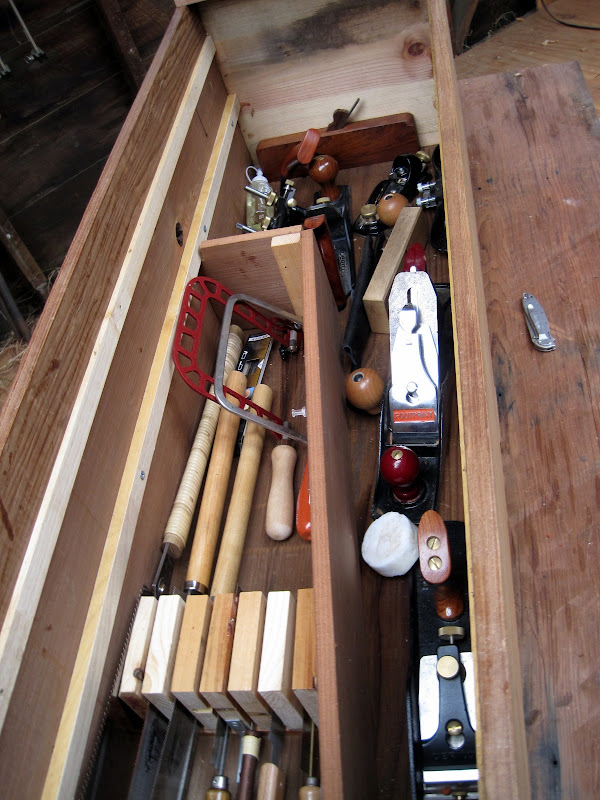
I'm content with the housing for the few hand tools I have. There are not a lot, but the ones I've got get me pretty far in my work. I can lift the box and carry it around fairly easily, although the cargo weight is biased towards cast iron planes which has in turn piqued my interest in wooden body planes.
I close with an excerpt from Toshio Odate's excellent book, and his brief comment on the toolbox: “Note that the toolbox is nailed together. The Japanese are especially careful about the joints in their work, and are, in fact, noted for the skill and beauty with which they create these joints. But While the dovetailing and other joinery in a cabinet may reveal the shokunin’s care, the drawers in the cabinet, like the joints in the toolbox, are nailed.
An American craftsman pointed out this seeming contradiction to me, and I had no answer for him, so natural did the use of nails in drawers and toolboxes seem to me. Yet, on reflection, I believe that the sight of a shokunin carrying on his shoulder a beautifully painted and carefully joined toolbox without nails would provoke me to an overwhelming sense of awkwardness.”
---
* Japanese Woodworking Tools Their tradition, Spirit and Use, Toshio Odate
 The wood originated from Urban Ore...some rough 2" roughcut fir that looked like it was used in a foundation...it had a lot of concrete stuck to the sides and needed vigorous wirebrushing before the stark power of my Lee Valley Scrub plane. Originally I had tried doing some of the hard work with my thickness planer, but the neighbor complained about the noise and I was in no mood to get into a bad situation, so it was all hand tools here

 75% of the time in this sort of a project is scratching your head and other body parts trying to come up with an idea on how to "design" something so simple. Lots and lots of looking at what other people do, knowing certain dimensions are almost invariant (18" is a good rule for height, give or take a thou). I suppose I could just have copied a design out right, but there are always certain factors in the way from me doing that. I like to draw and do it all the time at the office. just doodles while listening to people making noise with their mouths over speaker phones in sterile conference rooms. sometimes an idea or a shape will take hold and I will draw hundreds of variations on it...how should the legs look? How should they curve? How many curves are there?
Then there's the sort of design that happens from working the material...in this case it's doug fir. the wood had a gorgeous ring density and I knew it would be pleasing once done, but while working it over with the scrub plane, it clearly would be a negotiation rather than a dictation, on how this piece was going to come together. The grain went all sorts of directions from the knots. I'm a sucker for knots.
75% of the time in this sort of a project is scratching your head and other body parts trying to come up with an idea on how to "design" something so simple. Lots and lots of looking at what other people do, knowing certain dimensions are almost invariant (18" is a good rule for height, give or take a thou). I suppose I could just have copied a design out right, but there are always certain factors in the way from me doing that. I like to draw and do it all the time at the office. just doodles while listening to people making noise with their mouths over speaker phones in sterile conference rooms. sometimes an idea or a shape will take hold and I will draw hundreds of variations on it...how should the legs look? How should they curve? How many curves are there?
Then there's the sort of design that happens from working the material...in this case it's doug fir. the wood had a gorgeous ring density and I knew it would be pleasing once done, but while working it over with the scrub plane, it clearly would be a negotiation rather than a dictation, on how this piece was going to come together. The grain went all sorts of directions from the knots. I'm a sucker for knots.

 Here is how I keep track of the legs, the grain emphasizing a roundedness which will be important since these legs will be finger tennoned into the top


 Each step along the way increases the stakes in the project. I knew it would be important but I could not tell from my sketches on paper how I would resolve this joint in the finished piece. It took a lot of exploration with the plane, the spoke shave, a knife

 Turning over to work on the surface, I originally thought of this as a dished piece, cupping your posterior as you put on your shoes for whatever was next. but this is a hall bench and you don't want a cupping, cupping means you stay put, you want something to instead just be a temporary rest where you lace up, and then shove off...so a convex shape seemed to make more sense here...don't get too comfortable. various hand planes make this happen.
 Glue-up, each tenon split on my band saw for a wedge of some hard wood, pounded into position and making these joints for keeps

 I used tongue oil. It accentuates the grain and warms everything up, but also makes those wild fluctuations in the coloration of the wood more apparent. It's a matter of what you're into. I like my pizza burnt and am a little suspicious of those who dont


