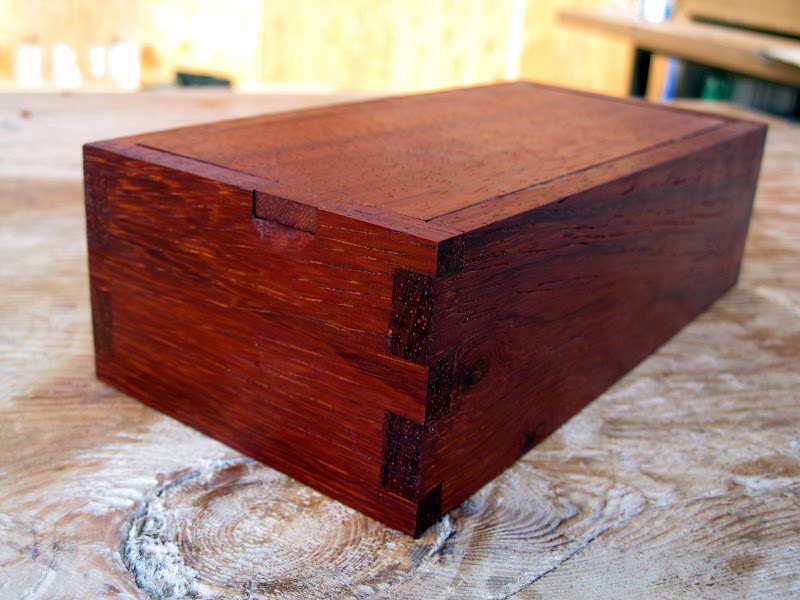
 Its lid hinge is just a lateral wooden dowel affixed to the inside going right into the sides of the box, nothing fancy:

A fellow named Jeff asked about my Japanese tool box pictured in the previous post. I said I'd show a few details of that here.
The design is heavily influenced by Daiku Dojo. The impetus to get a tool box housing my tools precipitated from a lot of the buzz over the past year in the lead up and wake of Schwarz' The Anarchist's Toolchest. I bought his book and read it over a couple times and all I can say is that I respectfully agree with two essential points: a) you need an enclosure for your tools, and b) you can get a lot done with a small amount of them (just what fits in the chest).
I think a lot of people, myself included, got hung up on his use of the big "A" word and what "subversive" means. I suppose one can be subversive by not going to Ikea to buy a piece of furniture. but that's a fairly minor way of being an anarchist. That said: setting my tools out in the open air on my *gasp* IKEA shelves, was a cluttered mess that attracted dust, the bane of all iron tools, and a personal shame for too long! I salute Christopher Schwarz for his work regardless.
Looking over the pictures, it is also obvious that this chest is heavily influenced by the tool kits my dad and I carried to airplane competitions. The box develops over time, to contain the tools as you need them, arranged in a way that is very base-brained. One should be able to find a particular hemostat or tweezers, or glue, without even looking. In "the field", you cannot at all be wasting time foraging through your tool box for a particular item. One should be able to reach for a razor blade, or CyA glue, or piece of reinforcing balsa without thinking, eyes focused on the broken spar, or damage. Gotta catch that thermal brewing on the flight line. You know you have about 5 minutes until the next one develops. That's 300 seconds to load a balsa fissure with super glue, install a new motor into the fuselage, wind the timer, and walk out to your winding stooge, and launch pylon for a new attempt where your flight judge is waiting with binoculars...oh I drift back to those years.
Anyway, here is my kit. I used a bunch of reclaimed redwood fencing from my favorite architectural salvage site, Urban Ore. Ran the wood through a planer and ended up with 5/8" thick planks that I edge jointed into a box whose LxWxH is roughly 45"x14"X14". Held together mostly with nails and drywall screws. I repurposed Sarah's old desk with particle board top (Schwarz has a good term for particle board: "Termite Barf"). This desk elevates the chest to about bench height, and then I put this all on casters. The casters are great. You have a portable tool tray where things can be set without cluttering the bench top. They can be easily repositioned around your work with minimal effort, they are always at an arm's reach and yet out of the way. The rolling service desk idea came from a surgeon who commented on Schwarz' blog and I cannot agree more with the utility of such an approach in an operating room, having been the recipient of much surgery over the past decade or so:

I borrowed heavily from Anarchist's Toolchest in setting up the interior. Two sliding trays of increasing depth allow me to separate my tools into groups that are sensible to me. Measuring stuff is low profile and always at the top, followed by my beloved few knives and chisels, and marking guages. Then the planes and saws at the bottom.


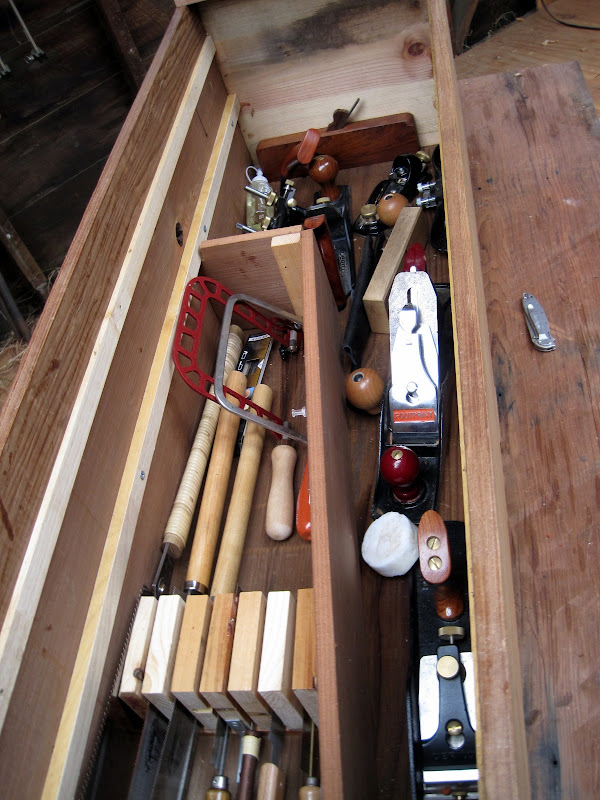
I'm content with the housing for the few hand tools I have. There are not a lot, but the ones I've got get me pretty far in my work. I can lift the box and carry it around fairly easily, although the cargo weight is biased towards cast iron planes which has in turn piqued my interest in wooden body planes.
I close with an excerpt from Toshio Odate's excellent book, and his brief comment on the toolbox: “Note that the toolbox is nailed together. The Japanese are especially careful about the joints in their work, and are, in fact, noted for the skill and beauty with which they create these joints. But While the dovetailing and other joinery in a cabinet may reveal the shokunin’s care, the drawers in the cabinet, like the joints in the toolbox, are nailed.
An American craftsman pointed out this seeming contradiction to me, and I had no answer for him, so natural did the use of nails in drawers and toolboxes seem to me. Yet, on reflection, I believe that the sight of a shokunin carrying on his shoulder a beautifully painted and carefully joined toolbox without nails would provoke me to an overwhelming sense of awkwardness.”
---
* Japanese Woodworking Tools Their tradition, Spirit and Use, Toshio Odate


These tools look happy in their "hangar" and away from contaminents - except your careful touch, of course. I especially like their "dolly" - very operating-roomesque. I have same in my auto garage and airplane hangar. It's a sensible essential. Surely you'll not consider a "nurse" to hand these tools. The delicious part is caressing the tool container for them. The reference to Wakefield is utmost and valid and I'm glad you are able to make the distinction and maneuver to yet another "plane".
ReplyDeleteThanks, Dad :-)
ReplyDeleteThank you for your detailed post on the toolbox. Yours looks like a very flexible design that can be re-organized as required.
ReplyDeleteI am a minimalist myself, but my question for those that use a toolbox as their primary tool storage in the shop (as opposed to using one to take a selection of tools away from the shop) is...what happens when you need to add tools and run out of room? Build additional toolboxes?
I know that drawers under the workbench are regularly derided by the 18th century woodworking re-enactors, (one called them a "Shaker bathroom vanity") but it seems to me a very sensible approach that uses space that is otherwise wasted, keeps the dust off of the tools, allows for as many hand tools as anyone is likely to need, and places the tools right where they are needed.
Also, I like the little box that you made for your co-worker. Very nice indeed!
Thanks for fixing the problem with the pictures in your archives. I really enjoyed the coopered sewing machine box posts. It reminded me of a toolbox in The Toolbox Book.
Thanks jeff - i think you should build whatever works for you and dont worry so much about the shaker bathroom vanity remarks. It works for the shakers, that ought to be sufficient rationale...QED. what's best is what makes your work in the shop an unobstructed flow, not what any woodworking writer says.
ReplyDeleteYou are right if i acquire more tools i'll need to build a bigger box (or at least a supplemental one). Im ok with that tho: the advantage of these boxes is that they go together quickly. Also, ive reached a bit of a stasis with regards to tool set so i plan on having this box for some time.
Thanks for the feedback on the sewing machine chest.
-sent from phpne.
I see what appears to be a thick blued plane blade (under the Japanese chisel handle) that looks like a Hock Krenov style but appears to be longer. If so, where did you find that? I have been looking for something like that for a plane project.
ReplyDeleteha! sharp eyes. yes, that's a Hock plane blade. Check out:
ReplyDeletehttp://www.hocktools.com/PI.htm
I got the radiused blade for a plane i want to make in the near future...
Thanks!I had not looked at their website in a while and did not know that they now carried the 4-1/2" long irons.
ReplyDeleteThough I know nothing about tool chest, but I found this Japanese tool box is so beautiful.
ReplyDeleteAmazing wood work, even cooler bike.
ReplyDeleteI noticed there haven't been any recent updates to the bike.
But I was wondering where you found that headlight as well as the mount for it?
Sorry this is posted on your woodworking posts. I'd appreciate the help.
Thanks and keep up the awesome blog!
hey curtis - thanks for the kind remarks on my bike! haven't had much to report on with it here. it's still in my garage and i do putt around on it. i have to keep it covered up or else the saw dust gets all over it :)
ReplyDeleteyeah, the headlight is an important part of the bike build, actually. i was after a bigish round one. the bucket is off an early 1970's triumph bonneville. don't know the year for sure. the mounting brackets were made by james banke down in felton, CA. they're just soft aluminum, pretty straight forward. he made them for me custom.