Continuation from
part i
well a fair bit of water passed under the bridge. here the headboard stands, in the white. THe frame is in poplar and i plan coat this with milk paint using a 2 tone schedule: first red, then a bit of topcoat, then black. burnishing/scrubbing will show small patches of red through the black and I think that will be nice. The center panel is reclaimed redwood from some northern CA water tower. I pulled 1/16" sheets of veneer off the bandsaw and applied this to a substrate that was scribed into the frame
first a small change to my shop arrangement here. i pushed the workbench up to the south facing sidelights of the garage and hung some tool hangers on a piece of scrap 1/2" ply on the wall. So far this has been really pleasant to the workflow.
I originally conceived this project to have a curved panels, captured into grooves routed into the surrounding frame. I tried a 3 layer layup using solid poplar sheets milled to 3/32" thick. Unibond 800 urea formaldehyde glue bent around a platen like so. However I was not happy with the springback and I was worried about how the hell to scribe this into the surrounding frame.
Maybe I cuold have used a thin sheet of bendy-plywood between the two layers of veneer, and it would have hugged the curve a bit better. I have searched and searched for ideas on the web on how to do this but still no go...

I started with laminating poplar up to make the headboard posts such that i could bandsaw the curves into the raw wood. I guess this is brute force way of doing things but poplar is cheap and the joinery is a bit easier to figure out if it can be done at 90 degrees. I made a few templates to make the lines. I freehand this on the bandsaw. It's helpful to keep the offcuts so that you can doublestick them to the piece when cutting the adjacent lines.
Here you see i've used the tablesaw with a crosscut sled to define the tennon shoulders for the upper rail joint.
Now i have the rough frame assembly. My next move was to bandsaw the inside curve and then scribe a panel to this
I pattern routed a bunch of ribs out of a full scale drawing and notched them into a leading and trailing edge which i fitted into the inside frame.
I estimated the rough size of the leading and trailing edges from placing a rib insitu. I'd then use a jack plane to shape the 8deg bevel on each edge of the assembly once it was all glued up.
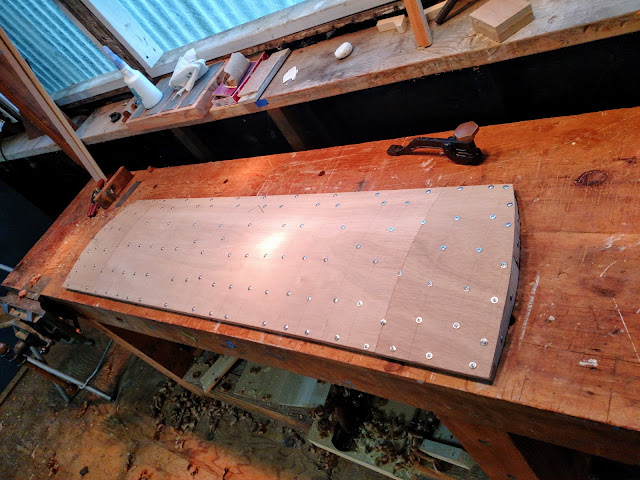
i will be laminating the veneer to a 1/4" nominAL wigglewood substrate glued to the subframe. i figured it'd be easiest to just scribe in the two curved pieces on the side and then skrew in the middle panel
i used washerhead screws to clamp the wigglewood to the subframe while the glue dried. I then applied some putty to the screw holes after the screws were removed. since the veneer is so thick, i dont think i needed to do this but it was easy enough to do.
here's what the panel looks like from the underside. I filled out the curved sides with some spare ribs. Since this is facing the wall, i figure it's okay to reveal this stuff.
here are the veneers that I pulled off from the old redwood, edge jointed to be about 16" wide overall. bookmatched. The wood is so dry and there are a few deep cracks running throughout that impart some "rusty" streaks. I'm Ok with this though...The green tape is something called "binding" tape. it's wonderful masking tape that has a stretchy property, so it works really well at pulling edge banding to plywood, or in this application where you're edge joining thin sheets of wood.
I am using some Unibond 800 that is past it's shelf life but still seems to dry. it's too cold in the garage to cure properly, so i set up the vacuum bag to chooch all day and over the night. luckily it fired off by the morning. The pump is fairly quiet so we were able to sleep despite the noise
To make the bandsaw cuts, i kept the remaining offcuts and reattached them using doublestick tape so that I could make the adjacent cuts
Here's what the backside looks like. It's not so glamourous but since this is the side that faces the wall, i'm ok with it. the panel will be skrewed into place by the tabs you see here


