Monday, September 6, 2010

Ecco!


Joining the top

I saved all Saturday just for the mortises. Four inches deep, 2" wide or thereabouts. Ouch.


So I wimped out and got my trusty hand drill out with the biggest bit in my arsenal, a 1/2 incher! It went pretty quick and I could use my brace to chew out the interior and then pare away the rest with my chisels


First time I tested fitment of the legs into the mortises, they got wedged in REALLY TIGHT, and no amount of huffing could get them out. I knew I had a scissor jack in the trunk of our car, but in a fit of laziness located a two boards near by, and FORSOOTH, a FIRST CLASS LEVER was born!


it actually worked pretty well, I could lift the trestle up, shove a couple boards under the tennon shoulders on one end, and then creep the other side up in a similar manner. I only had to do this about 57 times before the fit was working.

The next step was to figure out how to drill in a reasonably accurate way. A couple years ago in a stupor of inaccuracy, I grabbed a doweling jig at the local hardware store. These things are absolute junk for doweling, but the one I had had a nice metal index for the drill bits that I remembered. So I harvested it from the jig assembly and clamped it to the walls of my benchtop like so. Worked pretty well, and I was able to then use the same approach to place the holes for the tennons with a tad of offset in a reasonably predictable manner:


After attaching the legs, it was time to flip it over onto its feet.

Sarah implored me to wait for some house guests to arrive to help with lifting this thing (we were going out to dinner this evening). But I couldn't wait for them, and I could not lift the thing on my own. So I decided to use my dolly like so as a second class lever:


And I was able to get the bench on its side pretty easily like this:


Pause to drill some 3/4" holes for work holding pegs to support material during edge work.

trestle part 2

I had planned on using draw bored pegs to provide the tension necessary to hold the long stretchers in place when building the trestle. However my capability to precisely locate an offset hole in a tenon is not up to the job


So I decided to just tack a couple cleats to the inside of the stretchers for a board that could act as a clamping bridge to hold my glue job together. I'd then just drill and peg the joints as I had done previously


The trestle ended up pretty square so I wasn't too disappointed, but I'd have to come up with a different strategy if I wanted to use drawboring for the top.

Thursday, September 2, 2010

trestle part 1

Well, OK then! Now that the legs are cut to length, time to put the stretchers together.

I'm making the stretchers out of, GET THIS, reclaimed 2x10's I found at the architectural salvage site. some were reasonably straight but had some cup and wind in them that needed to be attended to. I first ripped them down to 6" wide with my skillsaw trick, and roughed them to flat with my scrub plane, then finished with a jack plane. The scrub plane got a lot of miles in today


I've mapped out the joints into the legs to look kind of like so: 1,1/4" thick tennons, 2" deep:


The stretchers will consist of a lamination of the above boards, looking like so:


I based the dimensions on how the legs lay up against the edges of the bottom of the top here. The critical one to measure out here is the tennon shoulder of the outside part of the stretcher lamination. It's close, but of course not perfect.

I'll have to fiddlefart a bit to get the two ends of the trestle close before mortising and drawboring. But my plan is to get the ends fitted and glued up first, and then I'll be able to have them set up for the more awkward fitment of the longer stretchers later. Make sense?


Back to the mortising! eeks, even with a 1,1/4 auger bit, bashing away 6”x1,1/4”x2” deep mortises is a workout. I don’t do them much so it’s good practice.


Doug fir seems to get harder with age, or rather the the late summer, slow growing part of the rings seems to get harder. Here, the ossified rings feel almost crystalline against the chissel.


after a lot of shoulder pairing (I should have been a bit more careful with the shoulder cutting in the first plae), the joints close up fairly well. The gap-filing capabilities of Titebond III will be explored here.

I did NOT drawbore these pegs since I have a wide enough clamp to hold the end pieces together.


The second pair of legs went together much like the first, but now I had something to build them off which helped with making the alignment decisions.


OK it’s now time to stitch the two lateral sections together with some beefy stretchers.

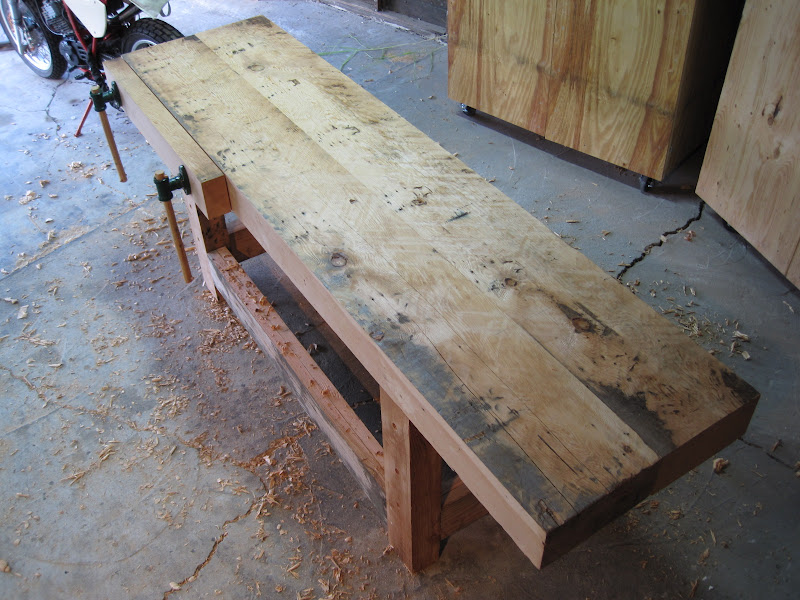
Once the end assemblies were finished, I went for the long stretchers, but before laminating them up, I clamped the boards up to the base to mark off the tennon shoulders like so:


Then, after marking and cutting the shoulders, and then laminating the stretchers, i tested fitment of the assembly like so, note the temporary cleats I screwed onto the tennons to hold the clamps in tension. worked okay but was awkward with only one pair of hands. I think Rube Goldberg would approve: