Saturday, October 22, 2016

queen size bed i

I'm looking to build a new bed for us. our current system is just a mattress on top of a box spring, on top of a foldable metal frame. it's i guess easy to carry from one apartment to the next, however i'm interested in something a little more comfortable, having a back rest and good stability.

I've been sketching this in my notebook for a while. Originally wanting to have some built-in drawers underneath but finally scrapping that idea. i dont' think we really need storage there since there is plenty elsewhere and it makes the whole project much more complicated.

I still like the idea of some cantilevered bedside storage for each of us that I'll have to design some way of attachment to the headboard. I'd like for these to be fairly sturdy, just in case someone tries to sit on them :-)

before hunting down the timber for the project, I first needed to make a full scale mock-up of the headboard. You can see it curves in two directions, inward and back. I want to do laminated curved panel, like the one I did for our guest bedroom futon.
I still have not figured out how to do a captured panel with grooves in the surrounding frame, though. In the previous work, I had the panel attached to a subframe that could readily be skrewed into the surrounding frame. This seems kind of ugly for the back of a bed's headboard, which while usually propped against the wall, is still something you can see if you're a nerd squinting around the edges, right?

Sunday, October 9, 2016

a built-in book case for Jen W on Market St.

Today I finished Jen's built-in book case for her home/office. Here are some install photos
The process began with a review of the current space. THere was a cinderblock shelving unit which she wanted to replace with something that fit the room a little better. A handsome built-in on the wall facing the windows is an example of what you'd typically see in one of these craftsman style bungalows all over the east bay area. I wanted to do a book case that was the same height, roughly 84" in line with the casement molding of the doorway into the kitchen.
Before I left, i made sure to take a lot of photos of the existing molding profiles as well as I could. I ended up making the base molding for this shelf using the similar base molding profile along the walls, so as to blend in.
Now some drawings in Sketch-up for Jen to review. We iterated on this a couple rounds. There is a surrealist painting by a close friend of Jen's that she had on the top of the improvised shelving that she wanted to be featured more prominently in this construction. We decided on this one, where the painting is hung from a floating panel attached to the center of the book case
To mount the painting, I decided on some adjustable height french cleats that can use the existing shelf pin holes. French Cleats are very handy for mounting things in plane. I used 1/4" dowel pins that could be driven into the holes on the shelf sides
Every built-in I do starts with a base-frame that I try to get as perfectly level as possible. THe bookcase consists of two stacked boxes that will be skrewed onto this base once it's level
Here we see the two case-boxes stacked onto the base frame. THese were skrewed into the wall studs along their respective top edges using a 3/4" nailer strip that was attached to the back, and then shims to accommodate the out-of-plumb wall. all walls are out of plumb, y'know...

I then applied the horizontal molding pieces which were already pre-mitered and painted. I just needed to cut the waist and crown to lenghth and then nail them in place. Since the floor was not level, i had to scribe the base molding into it first. Once these were nailed in, I could attach the vertical scribe molding to the walls.

Using my spoke shave to cut the side molding to the scribe line. I had to get creative with work holding using a hand clamp. My sawhorses, Kirby and Matilda were very helpful. It was largely an unplugged day, save for my battery powered drill and driver.
Update: today i got a photo with all her books returned

Monday, May 30, 2016

island countertop installed

Matt McGrane over at Tiny Shop Woodworks asked about the finish for the sapele countertop...Couple months ago i asked the guys at MacBeath what to use for countertops and they pointed me to this food-safe treatment called "The Good Stuff". It is a gel that you smear on, then wipe off. it's hard to go wrong and you can build layers slowly until desired protection. since i wont be cutting directly on the countertop. 3 coats seems to give good protection against water and I feel safe putting a beverage with condensation on it without rings forming immediately. Although truth is I don't really care about that kind of wear/tear on the kitchen. Rings, dings, and dents, that's all kind of what happens in a "user" kitchen.
the island countertop is clenched to the lower cabinets using some tiedown buttons that fit into 1/4" grooves i built into the rails when I was milling them up. I think I was lazy here. Instead of weak grooves just 1/4" thick running the length of the rail, I should have placed them deeper and not run them all the length of the board. I did it this way because I was milling grooves for the 1/4" panels and just kept my router setup the way it was. Well if these blow out i know how to fix it, and I can do that if need be.

Friday, May 27, 2016

island countertop in sapele 2'x8'

Earthsource Lumber in west Oakland had a *this much* flatsawn 4/4 sapele, warped and wowed. Sad to hear they will be going out of business next month. THey were an oasis of magnificent odd lot timber, just down Addeline street from me.

well i needed to make a kitchen island countertop, roughly 8' long and 2' deep, supported by two lower cabinet bases. The idea would be similar to how i made the passthrough countertop for the kitchen/dining room threshold. Take the flatsawn, rip to 1,7/8" wide strips, laminate, breadboard end, presto.

I make sure each board is ripped and laminated sequentially so that the grain on the side looks consistent. You end up with swooshes consistent with one another this way
I did a multi-stage lamination for a couple reasons. First to avoid the glue skinning over by the time i would have taken to glue up the entire piece. But also because I wanted to joint/plane each component board in my 12" capacity jointer/planer. once the pieces were thicknessed, I did a final glue-up of the two sides for the final assembly.
I neglected to show the joinery going on here, but it's a garden variety breadboard end, with a stub tenon going the entire width, and 3 1,1/2" tongues going deeper into the end so that they can accept a draw-bore peg.
I used a scraper plane and a card scraper to smooth most the tear-out from my planer. I also used a ROS using 100grit followed by 120grit.

Finish is called "THe Good Stuff", which is a food friendly wood countertop preparation. It feels pretty tough and builds nicely. 3 coats is all i want.

Imagine this slab being placed on the two lower cabinet units in the middle of the floor here

Saturday, April 23, 2016

kitchen uppers installed

Upper cabinets were finished and done earlier this week and last couple days were spent installing them. A nerve wracking endeavor and i was remiss on taking pics of some of the more ugly parts. there are so many things to remember when installing plywood boxes into unsquare/unplumb field. I allowed myself some room on the upper part of the exposed ends to scribe into the walls.

below, to the right is the stove hood upper cab. background are two flanking cabinets over stove. left on saw-benches is the bigger left hand side upper, adjacent to fridge surround.

I elected to use some surplus shelving brackets screwed into the wall below where the cabinets would be installed so that I could place them, shim them to level/plumb and then spend hours worrying about making sure all adjacent pieces are oriented.

also, had to reposition the romex a bit so that it will go into the aft knock-out port of the hood

The right side trio of cabinets were the hardest. I had scribed the part above the window into the wall before clamping them together. the wall ended up bowing outward so this made life hell because i then had to shim everything to the right of it to keep the scribe hugged to the wall.
There will be a two step molding along the top. a continuous ribbon along the horizontal intersecting with the top of the window
Here's a quick snap i took of the upper left cab, after installing and finding out it was 3/8" out of square. Had to take it down, remove the 1/4 ply back, wrack things into square with my camo tie-down and then reskrew the 1/4 ply back into place. WOrked okay this time, but best to try building square in the first place, hombre
I try to leave messages into unseen parts of the built-in work as a joke to whoever might see them in the future

Monday, April 11, 2016

kitchen pass through cabinetry and trim molding progress

trim molding is a deep pit to dive into, but necessary when releasing all your hard earned square plywood boxes into the unsquare, wild and wiggly world of a 105 year old house!

I chose to install these painted lower cabinets 3/4" proud of the surrounding drywall/lathplaster opening. this complicated things because the casement molding that surrounds the opening has to butt up against the face frame assy. of the cabinetry. You want to avoid having the spring of the interior curve of your casement on a lower plane than the cabinet's frame, which is exactly what I set myself up for here. The result is we'll have to fur out the casing a bit in order to make it look OK with the cabinet.

Here's what i'm driving at below. you see how i've lifted the casement molding off the wall and we'll have to lift it even further to get it looking alright. Tim and John both had mentioned just trimming the inside curve a little bit via table saw and this will help push the spring of the curve out further.

I have the mostly finished upper done today. Skrewed into the top and side with GRK cabinet screws. It is not attached to the countertop on purpose. it's just about a nickel's thickness over the countertop you see here. The idea being that I can remove the countertop and refinish it at some point (using "The Good Stuff"). also makes painting the cabinetry easier without masking tape.

I might have some little white shims under the cabinet that could also give the appearance of plinth blocks to allay any worries held by serendipitous, classically trained, neurotic guests, worrying about what i'd done...

I did not have much of an overhang on the countertop, so the "ear" you see where it overlaps the vertical trim is let into the trim a bit.
here's some more shots of the countertop construction. It's a lamination of a bunch of flatsawn sapele, ripped and turned to make it quartersawn. I chose this approach because the flatsawn boards were bound to have movement issues and i couldn't do a good job grain matching them. This way there is a sort of randomness to it, though not *too* random as I kept the strips in sequence and made sure to clock them all the same direction.

drawbore pegs driven home for that breadboard end. very satisfying indeed.

also, here you can see how the sapele is not full thickness. I figured it would be a waste and I have since attached some transverse oak battens with expansion slots for the skrews. this should help keep the board from cupping too much (i hope)

Saturday, April 2, 2016

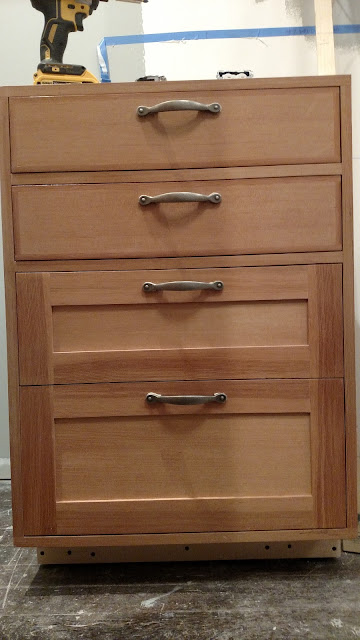
handle/knob location test

I'm pretty sure you want to center knobs on the level defined by the inboard edge of the rail in your door panel like so
Still not sure how to locate the hoop pulls for drawers. Are they centered on rails for the frame/panels, or do you locate them at the center of the panel itself of the topmost frame/panel, and then use the same distance from top of panel to locate the handles on the lower, deeper drawers?

Option A (I'm leaning towards this one). I center the drawer pulls on the top 2 solid drawer fronts. These are 5" high drawer fronts. I then center the shallower depth frame/panel pull, and then take this offset from the top edge and apply it to the final, lowest handle.

Option B