Monday, November 3, 2014

diablo woodworker club auction jewelry box in reclaimed redwood part ii

well it's done, learned a lot and also am left with questions on finishing.

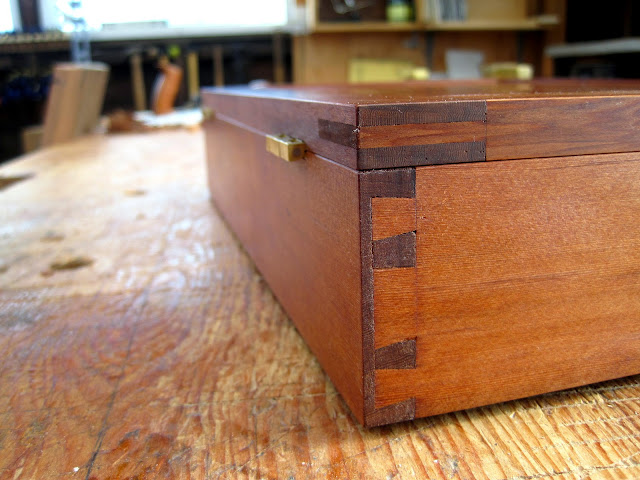
the small scale of this sort of project magnifies every little mistake. i chose a Watco danish oil finish with a few coats of wax. I'm left a little disappointed in the result with patches of a nice satiny gloss, and then some dull spots. perhaps not the best finishing schedule for redwood.

Previously, I mentioned having built the carcass wide. I saw no alternative but to remake the tail boards, 1/16" shorter. I traced them off the pins of the front and back, which is the reverse of how I normally do this operation (tails-first). the results are what they are. this is very delicate wood and fractures across the grain very easily. had to bob off the bottom of the pool on my toes to get one nostril above the waterline.

a note on these hinges. Brusso makes them. they're kind of like regular butt hinges, but htey stop at 95deg opening. I had to prune the screws a bit in order to not punch through the lid. The hinges are marvelously made, but I dont think i'll be using the 95deg kind again as I don't like the load they might put on the screws. A heavy handed user might wear out the threads of this soft redwood pretty quick. we'll just have to see.

These hinges were my first chance to use the new Lee Valley mini router plane. it was a joy to work with.

Just enough of lift off these little feet to hover the box over the surface a bit.

Sunday, October 26, 2014

diablo woodworker club auction jewelry box in reclaimed redwood part i

I've hooked up with the Diablo Woodworker Club in near by pleasant hill, CA. Nice folks who meet monthly at an adult education compound conveniently located near the BART line so I can show up at their meetings without having to drive in traffic.

What's unique to this club is that they do not charge dues, however we need to make some $ to pay for space, insurance, and usual stuff necessary for any group of people these days.

Soon the club will be entering member built work at a local craft fair to help cover expenses, so this is my first of hopefully many entries to help things along. The design I chose originates from a build-video that Marc Spagnolo did with Gary Rognowski here.

I loved the idea of gluing antique paper to the base of the box instead of the usual velvet or suede you typically see in a jewelry box. I also liked the overall proportions and there is a very handy primer in how to do bridle joints off the band saw. My project diverges by using a frame/panel lid since the hinge hardware I had wouldn't work with thin panels (but I used slip/bridle joints for the panel). I also elected to use 1/2 lap dovetails for the carcass joints to make the front side of the box as calm as possible, and show off this gorgeous redwood I found at the junk yard, Urban Ore

So now I need to figure out what my bandsaw's kerf offset is.

This is used to offset the finger joints along the fence like so

Works a Treat!

I improvised a router table from some plywood to help me groove out the panel recesses in the frame pieces. I learned it's best to do this BEFORE you cut your bridle joints as there's too little supporting wood in the tenons to resist blowout. Also, I love the feather boards. So simple to make and really hold your work to the fence.

Oh and this Lee Valley 6" square is an adorable tool. I use it almost all the time. True winner.

Here's a fix I had to do to one piece where I fired up the router when the wood was too close to the bit and it shot out the backside. Good learning experience.

Here's the lid panel, book matched from two slices of quarter sawn redwood.

The frame was squared and clamped up on top of the panel, and panel raising lines were derived insitu with the help of the blue tape gods

the bottom of the box will have magenta silk from my dear uncle michael via India. Bonded to the wood using white Elmer's diluted with water, applied with a course chip brush.

Needed to use a 25deg bevel on my 6mm chisel to shear the brittle fibers well enough. Still found this wood to be very unforgiving and weak cross grain, typical redwood, but I love it nonetheless.

And then things went awry. I mismeasured the depth of the box, and made the carcass too deep against the lid. The lid would have been the better choice to build too deep, as it's easier to trim. The half lap dovetails don't look right when the thickness of the outer end grain section gets too thin. I spent about 6 hours last night coming to the terms with the fact that there wasn't a satisfactory fix to this involving tapers. Plus I was not so happy with the way the gappy dovetails ended up. I needed the practice, and the grapes were sour.

Sunday, September 28, 2014

trundle bed part i

we've got plans to have a nice trundle bed in the corner of the guest room. The sketch-up (ketchup) drawing below shows the plywood components, excepting the one cross beam (more on that further down). These will then be clad in reclaimed redwood frame and panel facades.

For us, we wanted as low a profile as possible with the bed as it's going to mostly be used as a spot to lounge on and it's nice to be lower slung. But trundle beds tend to have a really tall profile due to the need for an extra tall span running along the opening for the lower mattress and all it's required debris. We're opting for futons with ~ 6" of loft. Casters are around 1,1/4" tall.

I talked to dad about it. he did a few quick sketches and sent them my way, recommending an aluminum I-Beam construction for the span. His calcs indicating that 2, 2" wide by 1/8" thick soft aluminum straps in a 4" I-beam should support 300 pounds of human pretty well along a 6' span. So it goes.

I concluded today with the beam, a lamination of doug fir that's 4,1/4"x2,1/2"x79,1/2" with the alu straps recessed into place. Epoxy and 2" flathead screws secure it to the wood. This ought to work, hopefully!

Sunday, August 3, 2014

reclaimed doug fir shelving part vi: desk assy and final install

12' x 9' shelving unit fully installed, with LED trim lighting and attached desk now ready to be enjoyed.

I left off with the joining/shaping of the desk legs. I chose to join the trapezoidal leg/stretcher shapes beforehand, and then beaver out waste with the band saw, draw-knife, spoke-shave, saw-rasp, and then manual sanding in that order. The joint between the legs and the stretcher is draw-bored. due to the shaping, a sizeable "shoulder" around the mortice is present. I could have doubled the time by doing all the shaping beforehand, but for this piece, i'm just experimenting with the overall shape and flow of the legs, and so I took this short cut.

I used a fabric cutting mat to help get close leg length dimensions. This desk surface is going to be on level with the step-back shelf on the wall.

Final shaping/sanding of the joint. Very laborious and in the end, I still left more than a few ugly sanding marks that showed up after applying the Danish Oil.

My very patient and awesome wife, sarah and shop-cat Paulo, frollicking in the shavings from the work.

here the desk surfaces and legs stand after some initial Danish Oil. I noticed the quart I got recently was very thick. It was unpleasant to wipe off to the point of being gummy. seems like they changed their formula.

but then the other day i found a pint at the store and sloshed it around, and it sounded like it was thinner. well sure enough, it was thinner, and behaved like the watco i remember earlier. Maybe the pint was from an older batch. I wonder, does anyone know what I could use to thin the viscous stuff if this is how they intend to make it? Or should I go for denatured alcohol and shellack?

Here is the larger section of desk installed. One outboard leg and tabs screwed/glued into the underside of the shelf setback. The other little desk is in the corner to the left of the reference frame here.

I tested the strength of these tabs holding power on my bench first

here's the corner desk that sarah asked for. it's just laptop computer size

Thanks for looking this over! Now onto a trundle bed for this room. I need to get it done before winter so that we have a decent snuggling perch for watching TV shows about the end of the world.

Saturday, July 19, 2014

don't know about you all, but i've been loving the spoke-shave posts that Paul Sellers has been uploading recently!

The spokeshave is my favorite wood working tool.

It's part sculpting, part carving, part planing. Using it, I dance with the wood. Of course the wood always leads but for me the spokeshave lends the best feedback sensing how grain flows, and reverses direction. All of his posts are worth reading, and I'm linking them here to assist their findability.

Thank you Mr. Sellers for uploading them!

I'll be going heavily into spokeshaves while shaping the desk table supports for our library. Here they stand, rough alignment and jointing work in progress for the weekend. Suerte!

Sunday, July 13, 2014

reclaimed doug fir shelving part v: LED/trim install

I proceeded with the LED tape install for the shelving once the vertical trim pieces were scribed into place. The tape is a convenient system that I bought off of Lee Valley. There's a dimmer as well, which emits a subtle buzz under lower outputs. I plan on housing the switch body in a wooden enclosure to minimize this, though.

The bust pictured needs a whole other post (blog...website...existential realm). This will be where the piece cools its heels in the red room. The tape lighting actually lights it well, and it's hard to get a good shot of the entire wall with my diminutive camera.

The lower left side section remains unlit as this will be where the desk is arranged.

Here's the switch: power from teh AC/DC converter in, to the circuit out. I'll house this in something

It took me a long time to figure out the wiring, but the easiest solution appeared to be running a line underneath the drawers for the lower lighting unit, then sending the "main" line up along the back of one of the uprights, where I could do all the connections from above. The tape is placed on overlapping bevels of the trim. It's nice and warm.

Here you can see the wiring placed along the space between the ceiling and the shelving carcass top. I used thumb tacks with electrician's tape to support the tape along the horizontal spans until the top molding was installed.

the connectors you get with this kit are about 5" end to end, which wasn't quite enough to make it through the gap between the ceiling circuit and the trim connection points. So I busted out some 18 gauge twisted wire from my motorcycle wiring days to lengthen them...yep.