Tuesday, December 29, 2009

sewing caddy outer carcass

OK, few more tentative steps towards a sewing caddy to put forth. now that the interior carriage is sort of done, it's time to build the "husk" that will nest directly outside of it. This involved rescussitation of a few old doug fir/redwood siding boards harvested from the throes of my rotting garage's rafters from an earlier post, jointed forth.

The vertical sides will be 9" tall so had to glue up a panel, making sure to note grain direction in the boards


One old trick about jointing mating surfaces is to fold them over and plane them thus:


glue-up and wait. wish I had more large mouth clamps to apply the pressure:


Now the tricky blocking out of the panels to length. That strut of wood interior to the xacto knife and outer carcass piece will be glued to the inside of the carcass and form the opposing cleat surface for the wedge which holds this entire piece together. Need to take it's width into consideration when measuring out the pieces and almost forgot this morning:


Chopping the tails for the carcass joints. Using a J. Krenov influenced layout where the tails are narrower towards the edges:


A lot of cautious sawing, and a few hours later and every joint is chopped out and fitment is tested. Looking actually pretty okay for my level of accuracy. Next step is glue up

Sunday, December 20, 2009

sewing caddy undercarriage

OK! spent some more time on the gutz of this assembly: the undercarriage for the sewing machine. This is just a simple frame of hard wood that the sewing machine will rest upon. I have no present intention to affix the frame to the sewing machine; its main purpose will be to be the interior support of a pair of lateral rods which hold the lower frame into the external "shell" cover. I'm sure this doesn't make any sense in words, but imagine a horizontal grove on the outside of the below frame, and an interior grove on the shell at the same place, and a long rod shoved down the middle to hold 'em together.

Anyway, the frame wood I saved from the happy destruction of an old lounge chair that Sarah had mercifully allowed me to architecturally reconfigure with my handy 10 pound hammer. we wanted it out of the house, and I wanted the material since it was made mostly of oak and maple. the maple seems okay, but punky in spots. The oak has a few worm holes but is harder than hell mostly. Had to rehone my POS 1/2" chisel a few times before I could punch it through these dovetail chops:


Testing fitment of the joints


How she rests right now

Sunday, December 13, 2009

Ratka's Sewing Caddy Part 1

Here's the Sewing Machine, gorgeous old iron. Ratka wanted something to house it other than the janky veneered particle board desk that it was attached to:


I'm going to go for a sort of "lunch pail" assembly. I'll make an undercarriage which will support the sewing machine from the underside of it's perimeter frame. This carriage will then have a sort of cleat which will connect to the exterior "shell". I have not diagrammed this well below, but should be apparent in later posts!


Job starts with wood, and I'm using some old panels that were up in the rafters of the garage when we bought the place. Really beautiful wood. Tight, tight grain, probably fir, but it could be redwood, I don't know. The key is how fine the rings are, which to me says: "Old" and Old Wood Is Beautiful:


My "Table Saw" is kind of Barbaric, but get's me close, and I thank my mate Peter Sutherland for hooking me up with an extra circular saw for the job!


Typical of wood siding, it has a bit of a cup to it so you plane out the bowed side, before you flatten out the cup here:


The tight tight grain of this wood made planing a real joy. I'm used to old, salvaged wood being kind of temperamental, and prone to tear out, but this behaved really nicely. The 14" Jack Plane from Lee Valley helps

Saturday, November 21, 2009

Trailtech Install, Part 22

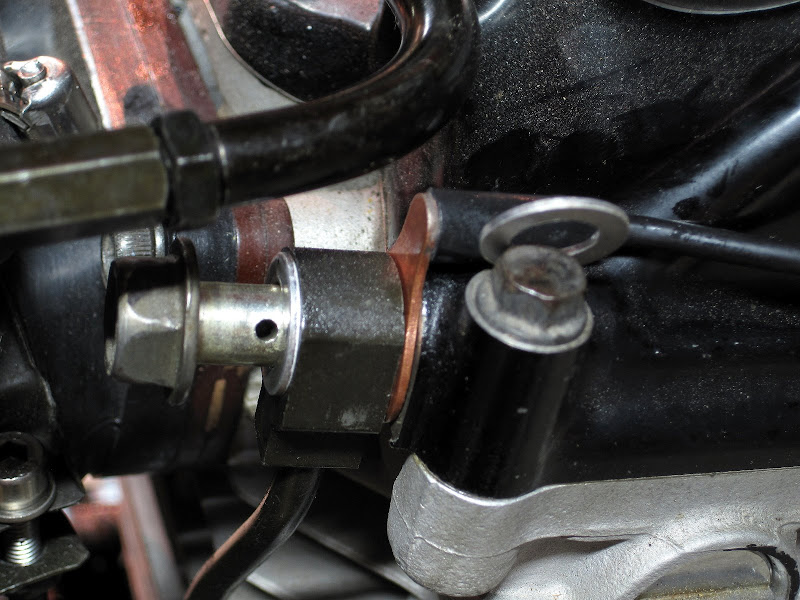
Cruised around the internet forums for clues on how RFVC impaired riders mount the thermometer to their engines. One idea is to place the sensor right where the oil line feeds into the cylinder head. I replaced the Alu washer proximal to the rockerbox cover. I don't think the pressures are great enough through that banjo bolt to cause much blood loss, so hopefully it will be okay. I've got the bolt backed out right now just to illustrate how it goes together here:


Tacho wire was simple enough, just wrap the busy end five times around the spark plug lead, and ground into the nearest convenient earth circuit, which for me was easiest done via that posilock tap up 'ere


One cannot underestimate the utility of having a cache of used inner tubes. 700x35c worked best to insulate my power switch terminals


And here it's all coming together


Wednesday, November 18, 2009

Installing the Trailtech computer

Pretty cool device, in theory. Polarity agnostic, so you don't have to worry too much about supply/ground issues. Their tech support said you do not even need to have a fuse on the supply side. I wish I understood why but when I touched the power leads to my battery, it all lit up just fine. Not that you absolutely need to have it hooked up to the bike's power circuit given the CR2032 battery that the unit will work with as well (albeit not as much illumination). Simple magnetic sender for front wheel, and all I have to do is wrap another wire around the spark plug lead to get revs...I fabbed up a little alu plate for mounting, included my ignition switch to be tidy:


The trailtech even comes with a thermometer and while I'd be eager to use it, the sensor takes the place of the crush washer for the spark plug. Any Honda RFVC thug will tell you how little elbow room there is in that zone...ah, the naughty parallels I could rattle off but wont...

Saturday, November 14, 2009

Instrumentation? Who needs Instrumentation???!!!

Tachometer enemas afoot. Tried a VDO but it was a NO-GO. Stupid sensor pickup was made for a car (or a harley), but not a bike.

Buckled and went for a digital Trailtech; its ubiquity and ease of use should make this work okay. But, but, but, that means removing the existing sheet alu "dash" Banke cut for an analog instrument, and with it the ignition switch. So I had to figure out a way to handle the ignition-kill circuits, leading me bypass the use of a key and just use a simple on/off switch approach. I saw this application of a ubiquitous hardware store toggle switch on the wrenchmonkees website and decided that it was kind of my speed:


Mine's quite uglier, but within reach, handling lights-on, and KILL. The key ignition was kind of a joke anyway. one could have easily cross wired the bike and made off with it. The only real test of security is whether a person could actually kickstart the temperamental engine:


For now? No instruments, and who needs em? I'm not raising hell on the highways. I'm putzing around in the hills and if someone asks, i'll just say it's about as fast as i want.

Ran out of gas today, tho. Felt the engine hiccuping at the top of grizzly peak, so luckily, just a long coast down the hill for a few lumps of petrol. I guess an odo would be helpful...

Here's a wiring diagram from a previous post on how the kill/ignition circuits look.

Friday, October 9, 2009

More Tacho Fail

I give up. Not sure how I could have fried the refurb tacho like this; wish I could have taken a photo of its guts before returning way back when I initially had a problem -- I'm betting those burn scars were always there. Can't imagine that I fried it a second time on install. Much ado about nothing. Guess I should just go looking for a VDO.

From their Tech Support

Hi Adam,

Sorry for all the troubles we are having here. We got the tacho back. It has blown the internal fuse again. Unfortunately it appears to have got some heat into it before it went. I have attached a picture of the board. When we went to replace the fuse the part on the circuit board it solders to came off, form the heat. Unfortunately there is no repair for this. I the picture this is the area in front of the harness plug right side.

As far as the gauge we sent that somebody stole from you mail. Not sure what to do there as cant really blame you for that.

Kind Regards,
Dan

Monday, September 28, 2009

More Boxes

OK, well I thought I was done making the favor box design but Sarah and I came across an old wine box at curbside while jogging two weeks ago in Emeryville. It was a 6 bottle, vintage 2000, who knows what per bottle, sad Robert Mondavi collaboration with Moulton-Rothchild in Opus One. Sad because of everything that Mondavi means to Napa valley but I'm not gonna hop on the bandwagon and throw turds at the family, I'll leav that to the oenophile hens out there. Still love the moniker and also getting handy with old wood*; turning it into something else. Not sure who'd want them but they're finished here:


------
* Did I just write that???

Thursday, September 24, 2009

tach attack!

Well, the repaired tach didn't work, so the kind fellows at SPA sent me another one in the mail a few weeks ago. I never saw the new one. I explain below in the letter enclosed in the parcel for the old tach that I'm sending back today:

Hey Dan - Adam here - sending back the old tach. Maybe you can find out if there's something wrong with it.

We talked about you sending a replacement a few weeks ago, and that I should send this broken one back to Indianapolis once I got the new one. Directly after our last email chat, I received an email notification from USPS tracing the replacement parcel's route to me, and I just assumed it would show up at my doorstep early the following week. So I waited some days and figured it would be at my doorstep when I got home from work some evening. However, more days passed, and I then went back and referred to the USPS tracking number; this time it claimed that the delivery had been made a few days earlier! I can only assume someone must have seen the delivery next to our front door from our street and decided to steel it. How unforgivably stupid of me to be so trusting. Actually, we had some other person try to break into our house through the back window a few weeks earlier, so I should have been aware enough to have the parcel shipped to my office. Doubly stupid.

At this point, I've cost the world two beautiful SPA tachometers from my own foolhardiness. It's an awful shame. I must apologize as I think you all have done what you could, but some people are simply beyond reasonable help and must be culled for crop fertilizer. I've returned my human-viability card to the proper authorities and will be reporting into the nearest DMV for organ harvesting. Sorry for the inconvenience.

Sincerely,
Adam Tracy

Monday, September 14, 2009

New Tacho On....The...Waaaaayyyyy!!!

but until then, 'tis boxes, boxes, boxes...my Inner Stalin likes to line them all up and play "Tanks rolling thru Moscow"


A little tongue oil and here they line up:

Tuesday, September 8, 2009

tach fail!

well, tried patching in the refurbished tach, and it appears to not be working. doing some back and forth with SPA in Indianapolis but here's the pudding

Thursday, September 3, 2009

got my tachometer back!

...but too absorbed in how to come up with an easy to produce lid for the favor boxes. Was trying to use a transverse dowel peg to form a sort of "cleat" that would hook up to a trench dug into the interior sides of the box with a chisel or my dremel. That lid appears on the right. But it's complicated to get everything lined up and I don't want to spend a lot of time fiddle farting with a drill.

Instead I'm gonna try something I've always liked about Japanese woodworkers' tool boxes which you see on the left and animated at the bottom.


Sunday, August 30, 2009

by 'manual' I mean 'by hand'

This space has been moto specific for so long. Bikes will always be a big part of the equation, It's also about doing other things, like chopping out dovetails, or the experimenting with my own bicycle shifting mechanism.

Anyway, I've got like 30 little wooden boxes to make for this upcoming wedding party. Hope I make it all in time. Just spent the weekend organizing my tools, honing the irons, building some jigs, making a proper shooting board...Macbeth Hardwoods is 5 minutes away and the logo on their staff shirt says it all: "Wood Is Wonderful"

Still chasing that oil leak in John Henry's cylinder head, tho. Don't think I wont be getting into that until the week after October 3, but for now, wish me bueno suerte!

Monday, August 17, 2009

ride report

OK, a handful of scrambles up into the hills and around briones reservoir, and I've accumulated a little data. Butt dyno says it's pretty good. Got a bit of an oil leak around the cylinder head, left side. Now a little oil leak aint the end of the world and there are more than a few XL600's out there with the affliction...I prefer to think of an oil leak as affirmation of oil actually getting to that part of the insides, myself...would be awful lot worse if it weren't. Still, how much is too much? I notice little spatters of oil on my left boot after a ride, so it's obviously producing more than just a little bit. I'm guessing that black stuff is road soot as opposed to some sort of precipitate from the oil, which itself looked pretty clean to me:


Here's a closeup of my plug. I did a Wide Open Throttle run in an industrial area right near home, probably not long enough to truly test that fuel circuit but still here's what the plug looks like


And finally, that rubber interface between the carbs and the intake manifuld does get pretty hot, not sure how I feel about the fuel line draping across like that. There's a mechanic's joke from the North Woods about assessing something ambiguous yet critical like this, you're supposed to shrug and then say: "It's probably OK". But you're laughing because you know that's the same thing muttered by regretful space shuttle engineers, aircraft ground crew men, and any number of botched shade tree mechanics out there.


Addendum


Here's a picture of the cylinder when I was doing the engine rebuild. I don't see how oil could be weeping out the left side of where the head makes contact...most likely oil coming from somewhere else...but where...

Thursday, August 6, 2009

finishing up seatpan

...hahah so funny to use the word 'finishing' when discussing this project which will never be done...

Well after a short trip to a land of tasty treats: , I've been back at it in earnest with what time there is left in a day.

Just had to reposition some mounting warts for the turn indicators, rewire the lighting and get the mounting hardware glued up


I had a Lucas style tail light from the J&P catalog kicking around and decided to go with it since it throws a more emphatic signal than the LED array that I had previously. Plus the clearance makes it okay now for a bigger light...heck There might even be enough room for some TRUCK BALLS on that thing:


The finish is rougher than a pimply teenager's face when you get up close thanks to my hamfisted technique but it's at least road worthy enough to vroom around in the local hills...soI think that's what I'm gonna do. Bye for now!

Wednesday, August 5, 2009

jetting reference

Just placing this thread submission here for now, a succinct rundown on how to tune a carb; probably my next exercise once back on the road...

From caferacer.net: http://www.caferacer.net/forums/topic.asp?TOPIC_ID=11580:


Tuning a carb is far more than just changing out a jet. Your first step is to ensure the engine runs well at full bore - that's when the jet is in full flow. You do this by putting in a new set of plugs and run the bike up to full throttle (on the road). Cut the ignition and check the burn color on the plugs - if they are a nice light brown and your bike is running good at full throttle then the jet size is correct. Your next step is to determine how the bike runs at 1/4, 1/2 and 3/4 throttle. These settings are adjusted by moving the jet needle up or down depending on the reaction of the engine. When the needle is moved down, it leans the bike out - when moved up it will richen up the mixture. This tuning step is used to adjust the mid-range of the carb. In most cases there is a little give and take when adjusting the mid-range.

Finally - there is the idle adjustment setting. This is done be adjusting the idle air screw. Typical setting is 1 and 1/8th turn out from the air screwed all the way in. On some bikes there is an additional idle screw that is used to set the carb idle. In a multi carb setup (2~6), carb sync gauges should be used to sync the carbs to each other. Again the air screw and/or the cable is adjusted so each carb provides the proper amount of gas for all throttle settings.

Bikes that stumble a little during fast throttle cracking is usually cased by the mid-range not set up correctly. Engines popping is usually a combination of valve, ignition and carb adjustment settings. Valve timing is easy - just set them up as called for by the manual. Ignition timing again is an easy setup. Carb tuning is done in the order of full jet operation, mid-range and finally idle settings.

Strictly referring to a chart to pick a jet size will only get you into a ball park. You still must do a plug reading to determine if you have selected the proper size jet. Things like state of your engine (beat or new), density altitude, what kind of pipe and air filter you use will determine your jet size selection. Charts are useful to getting your close - you still must tune for good performance.

From your description - it difficult to tell you if you have the proper jetting. Try checking the plug burn at full throttle and move on to mid-range adjustment. Your valve and ignition timing should be checked and adjusted before you start messing with the carbs. Remember to ONLY change one item at a time and check for improvement.

Take your time, follow your manual and you should have good results.

Saturday, July 25, 2009

seatpan frame interface glueup

OK, well from last night it looks like this is going to be good enough; I tried to photograph it but it's hard to make out. Here's a 3/4 profile from below where you can see the strips of fiberglass that were first formed around the frame rails, and then while that was wet, I "Nested" the seatpan onto them, allowing a bond to occur.

This is how it looks ejected this morning. I think it'll work out okay once it's cleaned up with a dremmel. Might add some more reinforcement in the gaps where the frame and seatpan deviate. I can also adjust the height/orientation of the seatpan off the rails by varying the thickness of the rubber pads used when they are applied, but for now it's "close enough"

As an added bennie, this assembly is much lighter than the original, and the license/light holders are integrated as opposed to bolt-on:

Friday, July 24, 2009

new seatpan mold, and assembly

Right, so I busted arse this week at work and staying up late trying to bang this seatpan out before leaving for a trip abroad (anyone reading this near Bilbao, Spain??).

However glue dries on its own clock, and given my propensity for being kind of slow at all this...well here we go:

First, The plug, prepped for the splash mold lay up. I hotgluegunned some cardboard flanges to define the edges; also to make a simple tail light and license plate structure.


That turned out okay


I did a layup into the splash mold. Used tinted resin, and here you see the ejected part. Typically rough finish for me, but I'll go with it. Some of the boogers will sand out but I got a few stupid air bubbles which left me fuming, but that insult is nowhere near the sad revelation that those cute little warts on the flanking area of the fender where I had planned to attach my turn signals are NOT going to work because I AM A SHIT HEAD and forgot to FEEL UNDERNEATH to OBSERVE THE FRAME RAIL directly on the interior side. Just one more trough in the daily sinusoidal plot. god fucking damn me. I'll just have to make some sort of wart 2cm aft of the present warts to mount the lights.


OK well moving on I did another layup like the initial seatpan, and then just nested teh top part right onto the drying epoxy layup. We'll see how this fails tomorrow morning.


Here's what the turn signals look like; you can see how the stalks mount up with wires threading through the interior: