Anyway, I was too giddy to not take it out for a quick spin up and down the street so I strapped on my helmet and leaped out into the street...luckily nothing horrible happened in the ensuing runs up and down the block --- just through 1st and 2nd. Jesus, the rear sprocket only has half it's mounting bolts attaching it to the hub. Banke must have left them in the bits box somewhere, i can't find them but they're easy enough to source.
My crotch-dyno says it is waaaay more oomph at the lower end than my XR650L. Just felt wheelie friendly. Stock 650L's are horrible off idle and even when uncorked, they don't ever yield an assured PULL when throttle is rolled on. With my hamfisted tuning, it seems like this bike's gonna do better than my L ever did. Sorry L:
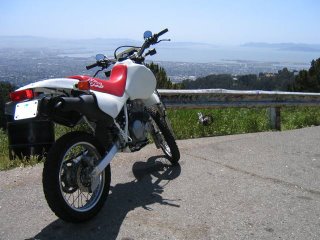
Anyway, I couldn't resist breaking the rear wheel loose in our mulch project out back. Tried to capture the moment below, kind of like I envision a parent might take a picture and blog/facebook/twitter their baby's first turd.


Congratulations!! You did it! Now It's my turn...
ReplyDeleteYeah, they left some of the bolts out of the rear sprocket AND tensioned your chain too tight. I say LET the rear wheel hit the exhaust, if you keep your chain over-tight, you will do countershaft spline damage with normal riding. Don't ask me how I know. Oh yeah, congratulations. :)
ReplyDeleteYeah! Congratulations! :-) Have you checked the color of the spark plugs?
ReplyDeletethumbs up.
ReplyDeleteThanks fellas - I'll check the plug today and report back Alexander - Not a bad idea; I'm sure there will be more time in the garage tuning the carbs. Haven't even gotten to the main jets yet...
ReplyDeleteHey Joel - Funny thing about the chain length: I was testing clearance for the license plate holder/fender a while ago. With the shock detached from the linkages, I'm able to pull the wheel all the way up into the muffler. I didn't check to see how much actual play was in the chain at this position. Not sure I'm getting the geometry here: would the chain be tighter as the suspension compresses? Seems to me that the longest extension of the chain happens when the countershaft, swingarm pivot, and rear hub are all in a line...anything past that and the total distance from the countershaft to the rear sprocket is actually getting shorter...I duno, I just woke up so I'll have to ponder this on my jog :)
That aside, what compounds the situation with the rear wheel is that the snail adjusters are all the way in, so there isn't much room to make the chain looser. Further, the rear wheel, because it's an 18" rim (Stock is 17 as you know), the tire is really close to the inside of the swingarm, maybe 3/32" away from rubbing. Now it doesn't do anything at low speeds, but believe me: tires do funny things when you have them spun up at higher speeds, or cornering, etc.
I'll have to verify that one with the builder...
The chain does get tighter as the suspension compresses. That's why, you told me, that they tensioned it too tight in the first place, right? So that as the suspension compressed, the tire wouldn't hit the too-big and in-the-way exhaust pipe?
ReplyDeleteIf the snail cams are in the way of you loosening the chain due to wheel size, you need to add a link or two, although the best solution would be an aluminum swingarm with a depth that accommodated an 18" wheel. That option would be a little more difficult if you wanted to fit one with factory disk brakes, as those models were produced after they offset the shock and linkage to accommodate a single carb. There are dual-carb era aluminum XR swingarms with no offset and drum brakes that may do that job, but I don't know if they are prefectly compatible with your disc brake retro-fit.
The chain needs more slack than I see there. You have not-too-worn chain sliders, so you can handle the right amount of chain slack. I used to over-tighten my chain since I had no slider on the swingarm, and plus I didn't know any better at the time. The result was damaged countershaft splines. The suspension lifts up and the chain gets in the way, and the pressure is applied via the chain to the countershaft sprocket, apparently. I dented the splines on 2 shafts this way, and as soon as I stopped over-tightening, the ones on the '98 were happy.
Wait, I probably shouldn't have said 'tighter' above...I am assuming we're talking about the system undergoing mechanical binding stresses because there's not enough chain length to allow free travel of the swingarm through it's arc. Is that right?
ReplyDeleteI must have misspoke about the fabricator's selection of chain length to govern travel, actually: They never set the chain length to limit suspension travel since that doesn't make physical sense. They did have to relief the exhaust muffler to get it out of the way of the wheel however. I'm thinking they got it out of the way *just enough* for the wheel to clear before the shock bottoms out.
My only concern with their setup is how close it comes to the swingarm. Adding an extra link (well actually it's two links, which might make the chain in turn too long) would be sub-optimal. I don't konw if having two adjacent master links is even kosher :)
You can put as many master links into it as you want to. They are no weaker than any other link, don't you know that old saying about how a chain is only as strong as it's weakest link? If the wheel is close to the crotch of the swing arm and you can't add slack, and you need slack, you need a longer chain, plain and simple. Now if the thought or look of two master links just bothers you, know that it is possible to get a rivet-type master link somewhere, and have someone with the rivet tool (also inexpensively procured) rivet the extra link or two on there. You're going to need a little press for your master link, and you should at least get one of those. Motion Pro makes a nice one.
ReplyDeleteIf your snail adjusters are at their maximum tension setting AND you have the wheel near the crotch of the swingarm, that needs to be changed. At that point you would need to either go to a 17" wheel, or a swingarm that accommodates the 18" wheel.
You will need to adjust the chain throughout it's life by using those cams as it wears, removing and adding links is too large an increment to be playing with, not to mention a pain in the ass. If that is not the case and you at least have 5 clicks to play with, adding two links at first and then removing one if needed should give you a sufficient amount of slack without being excessive. I just saw the bike sitting on the ammo can stand in one photo and the chain looked totally tight with no slack, in the position where there should be the most slack. There should be a substantial amount more.
I wonder if yours is a new chain. New chains will streach some and there is alyawys wear that is going to happen. Apparently, there can be mechanical damage to th running gear before that happens.
ReplyDeletehi pop - yeah it's a new chain, as long as there's enough slack to permit free range of motion without binding, then it should be okay.
ReplyDeleteI've done a bit of reading today on how to set chain slack. Probably the definitive answer I've scraped together so far, approved by guys on a moto forum who work as tech inspectors for the track:
Do you want to know for sure? Disconnect the shock (via lower clevis or dogbone, whatever is easier) and then move the swingarm so that the rear axle, swingarm pivot and countershaft sprocket are all in straight line. This is the tightest point the system will see. Adjust so there is no binding at this point. Then, when the system is bolted together again, measure the slack and this will be your verified chain slack spec.
I like this explanation because removes the guesswork involved in figuring how much chain slack you need with the suspension deployed.
That makes sense to me now about the straight line part. I'm glad you did more research on chain slack. Now to apply it to your bike, hopefully there are no limitations in the way it is configured.
ReplyDelete